Feeds:
Posts
Comments

Archive for the ‘Stamping’ Category

Our family will be celebrating our grandson’s First Communion in April. I wanted to get his card finished early since I still have to make his banner for church and his rosary. I will share both of those projects as they are completed, but in the meantime, here is the card I made for him.

I must admit I was concerned going into this project about what I would do for this card.  Carson’s favorite color is yellow so I wanted to use that color for sure.  Once I figured out the other colors to compliment the yellow, the design was the next obstacle.  I rented the Raisin Boat First Communion stamp set specifically for this card, so naturally that was the starting off spot.  I auditioned different configurations until I came up with this.  There are actually 3 ribbons that are layered behind the focal matte.  The bottom layer is a sparkly silver ribbon which I liked but felt it needed to be toned down just a bit.  The next layer of sheer silver organza ribbon did the trick but I felt it needed something more so I added the thin line of silver cord and adhered all of the layers down.  The matte is popped using dimensionals from Scrapbook Adhesives.  It took 4 tries to get the sentiment and chalice to emboss nicely, but the extra effort was well worth it since I think it turned out perfect.

First Communion Card

Supply list

Raisin Boat Stamp Set – First Communion
White cardstock – Papertrey Ink
Silver cardstock – Stampin’ Up!
Yellow embossed card stock – Club Scrap
Ribbon and cord – Stampin’ Up!
Sparkle ribbon – Michael’s
Silver embossing powder – Stampin’ Up!
Versamark
Matte cut from Silhouette Cameo – Image from Silhouette online store

Thank you for visiting.

God Bless,
Linda


Read Full Post »

I have a quick card to share that went along with the shabby chic cheesecloth flowers I posted about yesterday. This is a thank you card that I made for the hostess of the Shabby Chic Cheesecloth Flower Swap at Your Paper Pantry. The paper matches the colors I used for the cheesecloth flowers as well as the card used to present the flowers. I decided to make a removable tag to add to the inside of the card and the flowers attached to the top are left over from the project. I thought adding a tag to the inside would be a fun element and usable as well.  The flower on the front of the card was colored using my Prismacolor Pencils along with Gamsol.  The sentiment is from The Stamps of Life, and the flower, cardstock, papers and ribbon are all from my stash and I believe are all Stampin’ Up! products.  Memento black ink was used for the stamping.

Springtime Thank You

Springtime Thank You Inside

That’s my quick share for today.

Thanks for visiting.

God Bless,

Linda


Read Full Post »

I love being the part of the community at Your Paper Pantry and decided to join the 75% Spring Challenge for February. This is how it works, the participants are given some paper and embellishments and are required to use 75% of those materials to make a project of your choice, using the theme of the month. This month the theme was Spring. The finished project is then sent to the Hostess of the challenge and we receive one of the other participant’s projects in return. Sounds simple doesn’t it? Yet for me it was fun yet quite intimidating at the same time.

75% challenge Spring - Banner

This is my first attempt at such an endeavor and it was truly a challenge for me. When I first received my packet with some 4″ x 4″ papers, a few short pieces of seam binding, washi tape (a must use item) and printed images, I worried what to make with these elements. After a lot of thought, and even one sleepless night, it dawned on me to make a Spring banner. Why that thought came to me is a mystery since I have never made a banner before. Given the fact that the papers were so small I wondered if the banner would be an acceptable project to send in, yet I marched forward and started cutting and gluing. I worried if I cut something wrong I wouldn’t have any excess to work with, but still my resolve to make my project along with my commitment to the group kept me going. I thought the end result turned out rather well. Then I had yet another dilemma, I still had some paper, albeit cut in odd shapes, a few images, a bit of the 3 colors of washi tape (less than 5″ in total) and a few tidbits of seam binding left over. Since we had to use 75% of the materials sent, I knew I needed to make another project. What to do with such odd shapes of paper and small bits and pieces caused me a bit of stress I must admit? Marching forward I decided to make a meandering mini album with tags. You guessed it, I never made a meandering mini tag album before, but I didn’t let that stop me, not at all. It was a huge challenge for me though as almost all of the leftover papers were cut in small triangles. It took 2 days of piecing everything together, including gluing and mitering edges of small pieces of paper on the front cover to make it look completely covered when in fact it wasn’t. I do like the end result of this mini album and tags and love the fact that I was able to use all but a few tidbits of the materials to make 2 projects. It was a creative challenge and a boatload of fun.

I didn’t take pictures of each decorated page due to time restraints in getting everything packaged and mailed to Shelley in time, but I did take a moment to shoot the front cover along with the tags and those pictures are below. I worry if my projects will measure up to challenge, but at this point they are on their way and I just have to hope they will be OK.

75% challenge Spring - Mini Tag Book

75% challenge Spring - Tags for mini book

If you haven’t checked out the wonderful folks over at YPP, I would highly recommend you taking a look. It is the most positive place I have found, the projects are exceptional and the people are second to none. I love having a place to exchange ideas and learn about paper crafting and I hope you do too.

Until next time, God Bless,
Linda

Read Full Post »

I must admit that I’m rather late on the bandwagon when it comes to the Prima Doll Stamps.  However, now that I’ve discovered them I am thrilled to have 2 that I can play with and make fun projects to share.

Our youngest daughter celebrated her birthday last weekend and I wanted to use one of my Prima Doll Stamps to make her card (my first project using my new Prima Doll Stamps).  Given the fact that they are approximately 8″ tall I thought cutting a card in the shape of a tag would work fine, and indeed it did.  Even though you only see the front, it does open up in the usual card fashion to reveal a birthday sentiment along with a special note that my hubby wrote to her. I’m the card maker and he has a beautiful way with words so he always writes the sentiments. This dual effort makes each card we give to family and friends something from the heart from both of us. I love that.

Prima Doll Birthday Card

I used quite a few elements to make this card.  The base card was cut using Vanilla card stock from Stampin’ Up! and layered with a pretty blue paper also from them. The denim paper is very old and is from Paper Pizazz, but I thought it went perfectly as the background for the doll. The paper pieced dress, headband and jacket is also from some very old papers I had in my stash.  The doll was stamped on a piece of the Prima skin tones paper from their paper pack. I really like those papers.

I am just learning how to color with Copic markers and used a few to color her skin and hair.  A bit of cotton crochet lace that I cut in half was adhered at the hemline.  The beautiful lace towards the top of the card is from a roll I purchased at WalMart awhile back and the white tiny ball trim is from Hobby Lobby.  I love the pretty yellow flowers and they are all from Michaels, Recollections I believe, and the feather is either from JoAnns or Michaels.  Distress Tea Dye was used to ink the edges and a pearl swirl along with little white flowers were included to help the design and add interest.  It’s hard to see on this picture, but I used my glitter pen to accent the bows on her shoes.  A small piece of lace was used at the top along with a pearl centered button which I just purchased from the Spare Parts line at Hobby Lobby.  Of course, it wouldn’t be one of my projects without the addition of Stickles or glitter, so I tipped the roses with Diamond Stickles and called it a day.

I am happy with my first Prima Doll project, and Jen absolutely loved her card which makes me happy.

Another post will follow today showing some projects I made for Your Paper Pantry, but I didn’t want to add too many projects within one post.

Thanks for visiting and until next time, God Bless.

Linda

Read Full Post »

Valentine Cards

In the midst of the snowstorm here in the Midwest I thought it would be a good time to make a few Valentine cards for the upcoming event.

The first card is quite similar and was inspired by K Werner Designs. I’m not sure when she made her card, but I liked the idea of using scrap ribbons to form the focal point of a card. I did add my own spin on her design, however, by making the paper buttons that I glittered rather than using ones purchased. I also changed the sentiment to be placed in the upper left hand corner, rather than the bottom. I can’t recall if she added the stitching lines or not, but I think that adds to the charm of it.

I love you

The second card was inspired by the London Market paper pack by Pinkpaislee. I thumbed through the papers in the pack and found this one that I just felt was perfect for our granddaughter for Valentines Day. The card came together quite easily. The banners were cut with a die set from The Stamps of Life and the linen thread is from Stampin’ Up! that I’ve had forever. I just had to include some bling on the banner as well as Stickles for extra sparkle. I almost forgot, I stamped the word Love, and a heart on 2 of the banners. I believe the heart stamp is from Raisin Boat and the LOVE sentiment is from The Stamps of Life.

London Market Valentine
That’s it for today. I have quite a few more Valentine cards to make along with a few other paper crafting goodies. I hope to have those completed and will share those with you as they are finished.

That’s it for now, so until next time thank you for visiting and have a Blessed Day.

Linda

Read Full Post »

I have so many projects finished and ready to show you, but with Valentines Day approaching in a few weeks I decided to share a few cards I have made for the occasion.

The first 2 cards are quite similar as you can readily see below. Rather than go with traditional red/pink/white cards for these, I opted to do cards that would be appropriate for Valentines Day or even for an anniversary or wedding. The stamp set I used for both of these is called “Perfect Pears” and is from my favorite new stamp company, Raisin Boat. I may have mentioned this before but if so please bear with me. This company has a boatload:-) of wonderful stamps and offers the best of both worlds by offering the option of either purchasing the stamps or renting them. I highly recommend checking them out if you are either an avid stamper like myself, or just learning and want to get your feet wet, as there is something there for all levels of papercrafters with many, many stamp sets to choose from.

Perfect Pair Valentine 1

Perfect Pair Valentine 2

Just a little bit about these cards, I stamped the words “We go Together” along the ribbon with Timber Brown Staz On Ink, it doesn’t show well on these pictures but is quite visible in person. The natural twine, Vanilla and Not Quite Navy card stock are from Stampin’ Up! and the brocade paper is from individual sheets I purchased at Hobby Lobby several years ago. I used my Silhouette Cameo to cut out the layered heart and inked the edges with Distress Ink, Linen I believe.

I really like how these cards turned out and hope you enjoying them as well.

Oh my, I almost forgot to mention that Raisin Boat offers a monthly challenge on their blog and I plan on entering these cards for that event this month. The prize for the winner is a stamp set of their choice.

Well that’s about it for now, I’ll be back to share many more projects in the next few days.

Until then, God Bless,
Linda

Read Full Post »

I love the Christmas Card Challenge at Your Paper Pantry because by Christmas this year, with zero stress, I will have all of my cards ready to mail to our friends and family.  Why you ask?  Because the Christmas Card Challenge at YPP asks us to create 5 Christmas cards each month and by simple math calculation I will have 60 cards ready to mail when the time arrives.

Here’s the scoop, each month there will be a theme, and you guessed it, this month’s theme is related to snow, snowman, snowflakes, etc.  So without further ado, the following are my cards for the January Challenge.

One quick note, you may wonder why the first card would depict the theme of snow.  It’s difficult to see on the photo, but the ends of the tree branches are actually snowflakes so I felt this would fit with the theme this month.

Jan 2014 Number 5   Jan 2014 Number 2 Jan 2014 number 1

Jan 2014 Number 4

Jan 2014 Number 3

Read Full Post »

Without spending a lot of time being verbose, I want to backtrack just a bit and share the cards I made for our grandchildren for Christmas this year.  In addition, we celebrated several birthdays during the month of December and one of those cards will also be included with this post (the other cards were posted previously for the other 2 birthdays)

Angel card resize

Angel stamp – Karen Lockhart
Sentiment stamp – Paper Wishes
Border punch – Martha Stewart
Colored with Prismacolor Pencils
Diamond Stickles
Versamark & Silver Embossing Powder
Papers from Paper Wishes
Cardstock – Stampin’ Up!


Snowman Card resize

Snowman Stamp – Karen Lockhart
Paper – Paper Wishes
Cardstock – Stampin Up
Colored with Prismacolor Pencils & Gamsol
Silver matte is from a yogurt (washed of course)
Diamond Stickles


Merry Christmas resize

 
Merry Christmas Tree stamp – Paper Wishes
Paper – Pinecone Press
Cardstock – Stampin’ Up!
Red & Silver Stickles
Versamark
Navy Embossing Powder – Stampin’ Up!
Image from Silhouette Store


Christmas stockings resizeStocking & Shelf Stamp from Raisin Boat
Sentiment Stamp – Paper Wishes
Wood grain embossing folder – Hobby Lobby
Cardstock – Stampin’ Up!
Red Stickles
Distress Ink
Brads – Stampin’ Up!
Paper Pieced stockings is paper pieced with fluffy stuff on cuff (can’t remember what the product is called)


That’s it for today.  Lots more to share soon.

Thanks for visiting and God Bless,

Linda

Read Full Post »

Along with the excitement of the Christmas season, we have a few other family celebrations in December as 3 of our 7 grandchildren have a birthday this month.  I don’t always post my cards and projects mostly because I am working on things at the last-minute and run out of time.  However, this year I made a concerted effort to have cards finished well ahead of time and to that end I have 2 of the birthday cards completed and the other on my crafting table in process.

Here are the first two cards that are finished thus far.

Kaitlins Birthday Card 2013

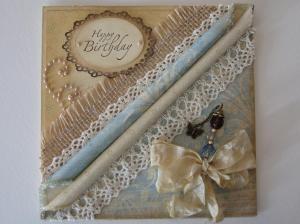
This card is for our oldest granddaughter who will be turning 13 this year.  She loves the color blue, as I do, so I wanted to make a special card commemorating this special birthday for her and chose her favorite color as a starting point.  I love the combination of burlap and lace, so I added those elements along with a removable handmade stick pin that includes a butterfly charm on a dangle.  The hand dyed seam binding along with the ivory pearl swirl added to the charm of this card I think.   It’s not noticeable on the picture I took, but I dyed some Diamond Dust a pale blue and added that along the ends of the rolled paper.  I was quite pleased with the outcome of this card and hope she will enjoy it too.

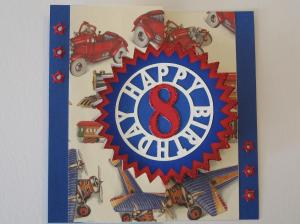
Her younger brother is also celebrating a birthday this month, his 8th, so I decided to use some car paper I purchased awhile back from a fine paper store (that I was hording) as the jumping off point for his card.  Since the flip cards are so popular of late, I thought that would be a fun project to work on as well as receive.  I used my Silhouette Cameo to cut the flip card, starburst matte, birthday sentiment and number 8.  Glitter and shimmer are a signature element I use on most of the card creations, so adding a bit of red Stickles was a must.  The original flip card stopped at the edge of the car paper but I thought it looked unfinished, so I added the blue sides along with star eyelets to add some extra umpf to make the card look complete.  I’m told he enjoyed his card along with the gift we sent to celebrate his special day.

Koles Birthday Card 2013

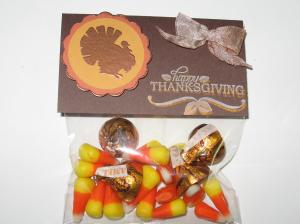
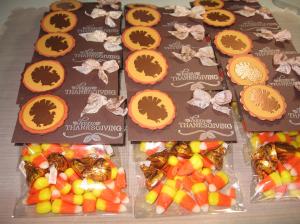
Now I must regress just a bit to Thanksgiving and share some little treat bags I made to set on the table for our family celebration.  This year was special because our oldest daughter, her hubby and their 4 children drove from Colorado to be here for the holiday.  Our house was abuzz with children’s laughter and fun family time since all of our 7 grandchildren were here and 3 of our 4 children.  It would be a blessing to have all of our children here, but it so difficult given the fact that our oldest lives so far away.  We do count our blessings though and will cherish all the great memories of that day for a long time to come.

As far as the small treat bags are concerned, they are a simple design but something I wanted to do for everyone.  The small turkey stamp was the basis for the topper and everything else just fell into place.  I decided to “ghost stamp” the sentiment with white and then top it with copper for a different effect.  The seam binding was hand dyed and the turkey along with the scallop edge was heat embossed with copper.  I’m sure the kiddos didn’t need any additional sugar that day, but it was still fun making the bags and sharing them with all.

Thanksgiving Treat Bag Close Up View Thanksgiving Treat Bags

My last share of the day is a gift bag I made.  I used my We R Memory Keepers Envelope Board to make the bows and my Silhouette to cut out the snowflakes and star.  Diamond glitter was used to make the snowflakes sparkle and 2 layers of paper covered the bag to accent the tree.  I love the dimensional aspect of the bag and it was fun to use some Christmas paper I had in my stash and put it to good use.

Christmas Gift Bag

Well that’s it for today.  I’m sorry this post is long lengthy, but I wanted to get up to date with a few of my projects.  I do have several other gifts and cards I will share this month, some already completed and others in various stages, but I’ll say goodbye for now and get back to my craft room.

Thank you for visiting and God Bless!

Linda

Read Full Post »

Christmas Card

I am so far behind on my posts and have several pics to share from Halloween and Thanksgiving, but in the spirit of the Christmas Season I wanted to share this card first.

I recently signed up with Raisin Boat for their monthly stamp rental program and was inspired to make this card with the first 2 sets I received.  I fell in love with these trees from the “Merry Nature” set and had this card in mind when I placed my initial order .  The holly is from the stamp set entitled “Deck the Halls”.  Truth be told, I am sure I’ll be purchasing both of these sets and renting another 2 since I love both of these sets so much.

I have a few other card ideas lingering around in my head that I want to make in the coming days with these beautiful stamp sets, but until those are finished I’ll leave you with this card share.

As a side note, I see on the picture that the glittery snow appears pinkish in some places, but in reality it is just shimmery.


Christmas Card 1

Supplies Used:

Merry Nature stamp set from Raisin Boat
Deck the Halls stamp set from Raisin Boat
Distress Inks and sponges to create the background
Claudine Hellmuth white acrylic paint for snow
Fan Brush
Cuttlebug embossing folder for window texture
Red Nailheads – Paper Wishes
Green & red marker – Stampin’ Up!
Red and Diamond – Stickles
Window image cut from Silhouette store
Cardstock from Stampin’ Up!
Homemade Glimmer Mist

Read Full Post »

Older Posts »