Feeds:
Posts
Comments

Archive for the ‘Silhouette Cameo Projects’ Category

I enjoy using my Silhouette Cameo so much that I can’t stop raving about it.  The Silhouette replaces so many products in my craft room including most of my punches and in some cases stamps.  As you can tell from this card, the words are cut out rather than being stamped which gave it another layer of dimension.  In any case, I enjoy making projects with my Cameo so it made total sense to use cut images for this year’s Valentine Card to my sweet hubby.   Shhhhh, he hasn’t seen this yet:-)

In addition to the cut images that I either purchased or received as a free download, I decided to jump in with both feet and design the scalloped edge card base myself.  It took much trial and error but I’m quite happy with the final result.  I know I could have purchased a scalloped edge card base from the Silhouette store, but I just felt the need to create something from start to finish myself.  Albeit, a simple, simple design, it’s my own efforts that put it together and that was the goal.  As I learn more I hope to try my hand at designing files that are more detailed and intricate.  Once I get a bit more proficient at designing, I’ll be sharing those file for free here on this blog.

Now onto the card.  The “Love Birds” image was designed by Samantha Walker and can be purchased at the Silhouette Online Store.  I think the image is quite beautiful and appropriate for this occasion.  The inside “love” pop up is a free download from Under a Cherry Tree.  Jin is an incredibly talented artist and has a wealth of information that she shares on her blog.  Jin also offers tutorials on You Tube that have been quite helpful to me as a new Silhouette owner.  I can’t thank Jin enough for sharing her time, talent and inspiration to those of us needing the extra help!

Even though this card is for my hubby, I couldn’t resist adding the pearls & ribbon.  I also tried my hand at making a stick pin to add just a bit more interest to the card.  Our granddaughter, Morgan, chose all of the beads for the pin and I think she did a super job.

I couldn’t be more pleased with how this card turned out and hope he enjoys it on Tuesday.

Thank you for visiting and stay tuned for my next post which will be a new baby quilt that should be finished by this evening.

Supplies used in this project

Red card stock – SU
White card stock – Papertrey Ink
Organdy ribbon – SU
Pearls from either Hobby Lobby or Michaels (I can’t recall)
Beads – ?
Love Birds image from Samantha Walker through the Silhouette Online Store
Love pop up inside card design from Jin at Under the Cherry Tree
Scalloped edge card base designed by me
Silhouette Cameo Designer Edition Software to design the card base

Read Full Post »

As a new owner of a Silhouette Cameo, I am interested in all things Cameo at the moment.  So, when I ran across this amazing offer, I had to go for it immediately.  What am I talking about you ask?  It’s a fantastic offer where you can get Silhouette products, including mats, blades, vinyl and the Designer Edition Software for 40% off .

Yes, you can get $50.00 worth of Silhouette merchandise  from Silhouette America for only $30.00 (this offer excludes the Cameo machine, download cards & shipping/handling).  There’s more good news, if you use this link, you will get an additional $5.00 discount, called Plum Dollars.  And if that isn’t great enough, if you also use the promo code   FABULOUS  you will get an additional discount.  After all of the discounts, you get $50.00 worth of products from Silhouette for $22.00 or 56%% off the regular price.  Now how is that for a fantastic deal?

I used my discount to purchase the Silhouette Designer Edition Software.

Sign up for the Plum District free account.  No strings attached nor cost to sign up, just use the link to sign up and receive a $5.00 discount called “Plum Dollars”.

PLUS, add the word    FABULOUS   to the promo code section when making a purchase and receive a 10% discount in addition to the $5.00 Plum Dollar Discount. (I don’t know when the “Fabulous” coupon code expires)

***The Silhouette offer is only good until 1/25/12.
***I don’t know when the promo code “fabulous” expires, but it was valid today, 1/24/12.

That’s it for sharing today.

Have a Blessed Day!!!

Read Full Post »

It’s been hard to find the time needed to make 2 very important birthday cards due to schedules and the holidays.  I was finally able to sit down and take the time these 2 cards deserved.

The first card is for our Grandson’s 6th birthday and is called “All Star Birthday”.  I wanted the theme to be celebratory, festive and sparkly and I think this card accomplished just that.  I used my fabulous Silhouette Cameo to cut all of the elements for the card with the exception of the card base itself and the red rectangle shapes added on the steps.  This style of this card base is called the Side Step card.  You can find the specific dimensions for cutting and scoring the “Side Step Card” over at Splitcoast Stampers.  Just follow this link to the Side Step card tutorial.

This card was inspired by another similar card I found over at SCS by “Lizzieboone13”; her card can be seen here.  The All Star Birthday Card has all of the sparkle that I enjoy adding to my card creations.  I used sprinkles of red Stickles to highlight the red stars and yellow Stickles for the flames on the candles.  The Silhouette elements were all resized to fit perfectly.  It took a bit of time to get the sizes of each element correct, but I like the dimension the elements give to this.  The Star Border is designed by Samantha Walker  for Silhouette and the individual stars are from the Silhouette designers.  (all purchased at the Silhouette Online Store)

Second I’d like to share a card I made for our Granddaughter’s 11th birthday.  Even though her favorite color is blue, I couldn’t help but envision this card with lots of pink and sparkles with a lollipop theme.  My first step was to set out to find the perfect lollipop shape in the Silhouette online store.  I chose this particular shape which is from a set of 3 lollipops designed by Sarah Bailey for Silhouette.  Sarah’s blog can be found at Studio B Creations.  Other designs on the card are also from the Silhouette Store, the scalloped oval by Lori Whitlock and the Cute Hearts & Stars Labels by Loni Stevens.  Originally I tried the heart-shaped lollipop with pink stickles and highlighting the hearts, but that didn’t work at all.  So, I decided to choose the whimsical lollipop shape and add Diamond Dust to mimic the look of sugar to highlight the lollipop.  Success, it was perfect.  I’ve had the “Sweet” Matstack by DCWV for sometime now and that was the first choice that came to mind when I was thinking about this card.  I wanted to use this particular Matstack because of all the sparkly papers in the packet.  As is the case sometimes, I knew the paper I wanted to use and the fact that I wanted a lollipop shape on the card, but I just couldn’t come up with the right design.   SCS to the rescue.  I searched for lollipop cards and finally came across something that I wanted to use for inspiration.  Ironically, my inspiration card also used the same paper pack, but what drew me to Amy’s card was the lollipop.  Even though I used Amy’s card for inspiration, I changed it up to make it my own.  So without further ado, here is the Lollipop Birthday Card.

Supplies – All Star Birthday Card

White card stock – Papertrey Ink
Red, Blue, Yellow & Green card stock – SU
Red Classic Ink – SU
Red & Yellow Stickles – Ranger
Martha Stewart Scoring Board
Stars & Candle Shapes from Silhouette Online Store
Glue Dots
Scor Tape
Glossy Accents – Ranger
3M Tape for ATG Gun

Sweet Lollipop Birthday Card

Sweet Matstack – DCWV
White card stock – Papertrey Ink
Pink card stock – SU
Diamond Dust – purchased at Michael’s
Pink Classic Ink – SU
Happy Birthday Sentiment Stamp by EK Success (This is a really old stamp so I’m not sure if it can still be purchased)
Shapes from Silhouette Online Store
Glue Dots
Scor Tape
Glossy Accents – Ranger
3M Tape for ATG Gun

Read Full Post »

The daughter of dear friends of ours and her hubby welcomed their firstborn, a daughter named Kennedy, into their family on 11/1/11.  I have been anxious to make a card and quilt, but with all of the craziness of the past few months, I wasn’t able to give it the time I felt it deserved.  I was finally able to sit down today and make a card to welcome this sweet bundle of joy.  Making the quilt is next on my agenda and once it’s completed I’ll share it with you.

I spent the entire day working on the design, coloring and cutting and re-sizing a variety of shapes with my new Silhouette Cameo.  It was such a pleasure to spend the day working on such a fun card.

Being a newbie to the Silhouette world, I started out by downloading a few designs to start the project.  The oval with the scalloped edge, the top border (without the cutout circles) and the tag were all downloads from the Silhouette Store.  You gotta love the ability to download an image anytime it’s needed without running out to buy a costly cartridge.

I wanted to use the large scalloped shape as a matte and have a white oval to stamp and color the design.  Since the scalloped oval didn’t have a topper I enjoyed playing around with the various tools to design one to fit.  I worked and re-worked the dimensions of the white smaller oval to fit just inside leaving a tiny border.  It took 4 tries, but in the end it was the perfect size and fit.  The top border was also a design that I downloaded from the Silhouette site.  However, I couldn’t leave well enough alone and opted to add a white glittered topper to the border.  Now that was a design feat in itself, at least for me.  Why you ask?  Because the original design didn’t have the cutout circles and it had to be resized to fit over the pink border.  That took a bit of time for me, but in the end it turned out just as it looked in my mind’s eye.  The sentiment was stamped on another image downloaded from the Silhouette Online Store.  Again, the white portion was resized to fit over the bottom layer leaving just a hint of pink showing.  By the time I got to the sentiment design it was much easier and faster to reformat the size.

Thanks are in order for those fantastic tutorials and members over at the Silhouette Plus Group.  I would have never known how to use the offset function or make duplicate images if it weren’t for those wonderful gals.  Thanks so much for sharing your time and talent to help all the newbies like myself.

Well that’s it for today.  Thank you for visiting and have a Blessed New Year!!!

Supplies used for this project:

Playtime Stamp from Stampavie/Rachelle Anne Miller
White card stock – Papertrey Ink
Pink card stock – SU
Patterned Paper – Paper Studio from Hobby Lobby
Prismacolor pencils, Gamsol & blending stump
Dazzling Diamonds Glitter – SU
Quickie Glue Pen
2 Way Glue – SU
Scor Tape
Silhouette Shapes from their Online Store
Memento Tuxedo Black Ink
Zyron
Dimensionals – Michaels

Read Full Post »

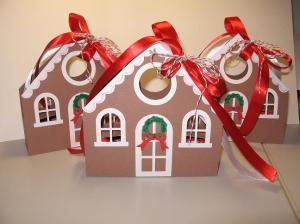
This is a quick post, but I wanted to share these adorable gingerbread house gift boxes I made.  I purchased the image from the Silhouette Store and the designer is Lori Whitlock.  I love her designs and when I saw this project I knew I had to take time to make them for Christmas.  The assembly was quite easy with just a bit of gluing and running various color cardstock thru my Silhouette.   I added a bit of Stickles to the rooftop and Christmas wreath for a little sparkle, red and white ribbons and twine was added for a candy cane effect.

As a side note, Lori offers a nice tutorial on putting these boxes together.  I opted to add the door and embellishments prior to assembling the box and thought that was a bit easier for me, especially when trying to line things up straight.  Well, that’s it for today.  Thanks for visiting and Merry Christmas!!

Supplies

Close to Cocoa, Real Red & Green cardstock from SU
White card stock from Walmart (good weight for this type of project)
Red Stickles – Ranger
Green Glitter Glue – Studio G
Red/White twine – SU
Red & White satin ribbon from Hobby Lobby
Gingerbread House Silhouette File – Lori Whitlock
Zip Dry Paper Glue (Lori recommended this glue for the project and I totally agree with her, it works perfect to hold everything together)

Read Full Post »

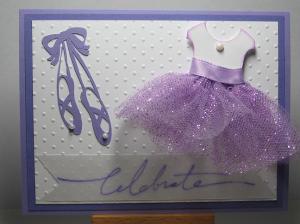
Our little granddaughter turned 3 today, but we all gathered yesterday for the birthday celebration.  She loves to dance and especially enjoys ballet, so that is the theme I used for her birthday card.  As luck would have it I just received my new Silhouette Cameo on Thursday so I was able to download the ballet slippers and resize them perfectly as an addition to the card.  The leotard was made from a punch I have had for several years and the tutu was hand sewn from some sparkly tulle that I purchased just for this card.  There are 3 layers to the tutu, as my first attempt with just one layer looked sparse and unattractive.  The idea for the tutu and leotard is from a card I saw here on SCS.  I liked the way the punch was used for the leotard and that was my starting point.  Thanks to mrsbblackmoor for the inspiration.

I can’t tell you how excited I am to be the proud owner of a Silhouette Cameo.  I have had a Silhouette on my wish list for years now and can’t believe I finally have one to enhance my card and papercraft projects.  I also plan on making appliques for my quilts using some of the fabulous designs or even by creating some of my own.  The best part is being able to download the design, resize, cut and glue it on the project without having to purchase expensive cartridges.  Most of the designs for the Silhouette are 99 cents which makes them quite affordable and there are so many choices for all occasions.  Thanks to my sweetie for getting this special machine for me.

Supplies

White Card stock from Papertrey Ink – (this is fabulous card stock)
Lavender, purple & Vellum card stock – SU
Tag punch from SU
Cuttlebug dot embossing folder
Glittery tulle from Hobby Lobby
Versamark Ink
Purple Embossing Powder from SU
Xyron used to adhere vellum to card
Dimensionals – SU
Scor Tape
Self adhesive pearls from A Touch of Grace – (I love these)
Ribbon from my stash
Ballet Slippers from Silhouette

Read Full Post »

« Newer Posts